How to Install a Solar Powered Attic Fan
A solar powered attic fan will keep your home cooler and reduce your electricity bill.
During the summer months, the attic space of most homes gets really hot. Attic temperatures can reach 140 degrees or more on hot days. This heat can radiate into the living spaces of your home, even if well insulated.
By installing a solar attic fan or solar roof vent, you can significantly lower your attic's temperature. This can make a dramatic impact on your home cooling costs.
Installing a solar fan is a simple project that a homeowner can perform themselves if they are comfortable working on their roof and in their attic. Since the solar power fan doesn't need to be connected to the homes electrical system, there also isn't any need for an electrician.
There are five basic steps to installing a solar powered attic fan...
- Determine the Number of Fans Needed
- Determine the Location of the Fan
- Cut Roof Hole
- Slide Solar Fan into Place and Secure
- Make Final Adjustments
Determine the Number of Fans Needed
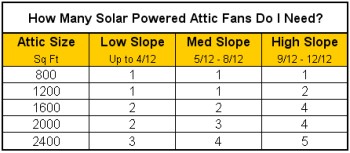
The first thing you need to do is figure out how many fans your home will need to adequately ventilate your attic. This is based on two things...
- The size of your attic
- The slope of your roof
The following chart is applicable to a solar roof vent that can cover 1250 square feet per unit...
Determine the Location of the Fan
There are a few considerations you need to account for when deciding where to locate your solar power attic fan...
- The solar fan should be positioned on the south or southwest side of your roof for optimum performance
- The solar fan should be located where the Sun won't be obstructed by trees or other structures
- The solar fan should be placed 18-24 inches from the peak of the roof, as close to the midpoint of the home as possible, and between rafters
- If two or more fans are needed, they should be separated by at least 15 feet to maximize circulation
Cut Roof Hole
Now that you know where your solar power fan should be located, it's time to cut a hole in the roof...
- At the desired location, drill a hole through the roof from inside the attic and insert a screw through the hole to make it easier to find when you go out on the roof
- On the roof, locate the screw. Using a 7-inch long piece of string with a pencil tied to one end, use the screw as a center point and scribe a circle around the screw. The circle should have a 14-inch diameter
- With a reciprocating saw, cut out the circle. Be careful not to let the piece of roof that is cut out fall through
- Remove or cut any roofing nails from underneath the shingles around the top half of the hole
Slide Solar Fan into Place and Secure
Slide the solar fan over the hole. If it doesn't slide in easily, check to make sure all nails have been removed. Once the fit has been checked, remove the fan and install caulking to the bottom and slide back in to position.
Once positioned, fasten the solar roof vent in place using screws and caulk around the base of the vent.
Make Final Adjustments
Now that the solar fan is secured, you want to make sure that the solar panels are pointed directly to the Sun's path at its highest point during a summer day. This may require you to rotate the fan's shroud or tilt the solar panel.
Once adjusted, you won't need to make further changes during the other seasons.
Enjoy Your Cooler Home!
Installing a solar powered attic fan is a terrific DIY solar project that can be completed in less than half a day. You'll enjoy a cooler home, which will save you money.
Note: Since each brand of solar attic fan will differ from other brands, you should carefully follow the specific instructions supplied with your installation kit.
Home > DIY Solar Power > Solar Powered Attic Fan