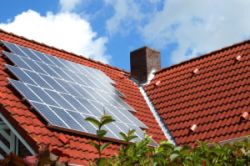
Build Your Own Solar Panel
Did you know you can build your own solar panel?
 Build your own solar panel: A great DIY solar power project
It's true. And it's not hard to do either.
There are only five steps involved...
- Step 1: Preparation
- Step 2: Create the Solar Panel Housing
- Step 3: Join the Solar Cells Together
- Step 4: Position and Secure the Solar Cells
- Step 5: Cover and Seal Your Solar Panel
Once we've gone through the process in more detail, I'll also show you a couple of methods you can use to minimize the cost of this DIY solar power project.
DIY Solar Panels: Step-by-Step
Step 1: Preparation
The first thing you need to do is gather all your materials together. The major items for this project are...
- Lumber and UV protector for the solar panel housing
- Non-conductive backing material (for example, plastic or pegboard)
- Solar cells
- Plexi-glass for the cover
- Soldering iron, tabbing wire, rosin flux pen, etc for joining the cells
- Various fasteners and silicone glue for putting everything together
- Wire
Once you've collected all your material, you're ready to start building your solar panel.
Step 2: Create the Solar Panel Housing
The solar panel housing is simply a box that will hold the solar cells. The bottom of the box is made with plywood and the sides are made with 3/4" x 3/4" wood. The top of the box will be covered with plexi-glass.
If you are using 3" x 6" solar cells, the plywood will need to be cut to about 44" x 21" in size. This will fit two sub-panels of 18 solar cells each. The 3/4" wood should be cut to size and joined to the plywood with screws to create a border for the panel.
At this point, you can cut the non-conductive backing and plexi-glass to size as well. You should also paint the solar panel housing and backing material with the UV protector.
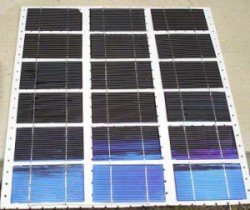
Step 3: Join the Solar Cells Together
Joining the cells together is the most challenging part of this project, but once you've done it a few times you'll see it's fairly easy to do.
Before getting started, it's important to understand that the back of each solar cell is "positive" and the front is "negative".
The solar cells should be joined "in series." To do this, you will use the tabbing wire to connect the front of one solar cell to the back of the next cell.
To get started with this step, you should place the solar cells on the non-conductive backing, front-side down. You can then use the soldering iron, solder, rosin flux pen, and tabbing wire to join the cells in each row together in series.
Step 4: Position and Secure the Solar Cells
Once all of the cells in each row have been joined together, it is time to glue each row to the non-conductive backing. This is done using the silicone glue. Each row should be glued to the backing before wiring the rows to each other.
Once all of the rows are secured to the non-conductive backing, you can connect the rows together using copper wire. Just as with the cells, the rows should also be joined in series.
Step 5: Cover and Seal Your Solar Panel
Before covering and sealing your panel, you should test your panel with a voltmeter and make sure that everything is secure.
Once you've completed your test, you're ready to cover the solar panel housing with the plexi-glass and seal it to provide weather-proofing.
If You're Ready...
... to build your own solar panel, I recommend you get the Earth4Energy package.
As you can see, it's not that complicated to build your own solar panels. But you'll save time and money by using a proven approach.
I've reviewed several DIY solar panel guides, and Earth4Energy was the best one. It has all the details and support you need to implement your own DIY solar power system using homemade panels.
Building Your Panels Cheaply
Now that you understand the process for building your own solar panels, I'll describe a couple of ways that you can use to reduce the cost of building them.
The most expensive components of a DIY solar panel are the solar cells. By using less expensive solar cells, you can significantly reduce the cost of your panel.
The easiest place to find cheap solar cells is on ebay. You may also be able to find discounted or free solar cells by checking with your town's highway department for damaged cells from road-side lights or a local solar installation company.
But the BEST way to reduce the cost of making your own solar panel is to follow a detailed guide. You could use the instructions on this page to successfully build your own solar panel, but it would require some trial-and-error, which costs you both time and money.
To save you time, effort, and money, I recommend you use the Earth4Energy DIY solar power kit.
The kit includes...
- Detailed, step-by-step instructions
- Videos demonstrations
- Materials lists
- Tips to save you money
- and much more...
Take action now and you'll be able to tell your neighbors that you built your own DIY solar electricity system!
Home > DIY Solar Power > Build Your Own Solar Panel