How to Install a Tubular Skylight
A tubular skylight makes a great DIY solar energy project. There are 6 steps for a solar tube installation.
Flat roof skylights as well as those on pitched roofs can be addressed with a tubular skylight installation. Also known as a solar tube or tubular daylighting device (TDD), these are devices that you can use to get natural light into rooms that don't have access to windows or traditional skylights. They do this by collecting sunlight on the roof and channeling it through a highly-reflective tube into the room below. This daylighting solution is perfect for dark hallways, bathrooms, and kitchens.
If you're comfortable working on your roof and in your attic, installing one of these devices can be completed in 2 to 4 hours. All you'll need is the solar tube kit and some basic tools.
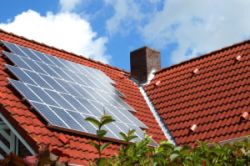
 Tubular Skylight
Photo: Courtesy Solatube
There are six steps to installing your solar tube...
- Choose the Right Location
- Cut Out Ceiling and Roof Holes
- Install the Flashing
- Install the Tube
- Install the Dome
- Install the Diffuser
Choose the Right Location
Choosing the right location to install your skylight will go a long way in avoiding any potential installation problems and providing a better final result.
Some key points to keep in mind...
- Choose a spot between ceiling joists and roof rafters (you want to avoiding cutting into your homes structural elements)
- Although elbow joints are available, for easier installation and higher light output, choose a location that will allow a straight run from the ceiling to the roof
- Make sure there are no electrical wires or other obstructions where you plan to install the skylight
Cut Out Ceiling and Roof Holes
Once you've finalized the location for your skylight, it's time to cut the holes in the ceiling and the roof.
Adjustable Hole Cutting Kit...
- From inside your room, push a nail through the ceiling at the center of where the diffuser will be
- From the attic, use a plumb line to find the spot directly above the nail that you pushed through the ceiling and drill a hole through the spot in the roof
- From inside your room, using a template or the ceiling ring, scribe a circle in the ceiling and cut out that portion using a drywall saw
- Install the ceiling ring
- From your roof, use a template or the flashing to scribe a circle centered on the hole you drilled earlier
- From your roof, use a reciprocating saw to cut out the section of the roof that you marked
Install the Flashing
Now that the roof hole is cut, you will need to install the flashing.
- Remove or cut any roofing nails from underneath the shingles around the top half of the hole
- Prepare the flashing for installation by caulking the underside of the flashing
- Insert the flashing underneath the shingles and tar paper at the slits you cut earlier, pushing it up until the shingles come in contact with the raised portion of the flashing
- Secure the flashing with the screws provided in the installation kit
Install the Tube
Once the flashing is installed, you're ready to build and install the tube.
- Measure the distance from the top of the flashing to the ceiling to determine how much tubing you will need
- Assemble the length of tubing needed
- Remove the protective film from inside the tubing
- Insert the pipe through the flashing until it is even with the ceiling ring
- Secure the tube to the ceiling ring and flashing with the screws provided in the installation kit
- Remove any excess tubing sticking out of the flashing by cutting it off using tin snips
Install the Dome
Attach the dome to the flashing using the screws provided in the installation kit.
Install the Diffuser
Attach the diffuser and trim ring to the ceiling ring.
Enjoy Your Tubular Skylight!
These are the general steps for installing a tubular skylight. You now have a good idea of what's involved in this project.
Note: Since each brand of skylight will differ from other brands, you should carefully follow the specific instructions supplied with your solar tube installation kit.
Home > DIY Solar Power > Tubular Skylight